Minimum Design Metal Temperature (MDMT) and Impact Testing Guide
The Minimum Design Metal Temperature is a critical safety parameter in mechanical engineering that defines the lowest temperature at which a component can safely operate under full pressure without the risk of brittle fracture. Understanding this threshold is vital for carbon steel systems, where temperatures below -29 degrees Celsius often trigger stringent material toughness requirements.
What is MDMT?
Minimum Design Metal Temperature (MDMT) is the lowest temperature a material can withstand at its maximum allowable working pressure. For many carbon steels, the default MDMT is -29 degrees Celsius. If operating temperatures drop further, the material may require impact testing or stress reduction to prevent catastrophic brittle failure under load.
In This Engineering Guide
Engineering Knowledge Check: MDMT Fundamentals
Question 1 of 5Quiz Complete!
Complete Course on
Piping Engineering
Check Now
Key Features
- 125+ Hours Content
- 500+ Recorded Lectures
- 20+ Years Exp.
- Lifetime Access
Coverage
- Codes & Standards
- Layouts & Design
- Material Eng.
- Stress Analysis
Understanding Minimum Design Metal Temperature for Carbon Steel
In the context of 2026 industrial safety standards, the Minimum Design Metal Temperature serves as the primary safeguard against brittle fracture. Carbon steel, while versatile, undergoes a ductile-to-brittle transition as temperatures drop. Below a specific point, the material loses its ability to deform plastically, leading to sudden, catastrophic failure under stress without prior warning.
Why is -29 degrees Celsius the standard limit?
Most engineering codes, including ASME Section VIII and ASME B31.3, recognize -29 degrees Celsius (or -20 degrees Fahrenheit) as the lower limit for standard carbon steel grades like SA-106 Gr. B or SA-516 Gr. 70. This value is based on historical empirical data showing that common carbon steels maintain sufficient notch toughness down to this level. Beyond this threshold, the risk of brittle fracture increases exponentially unless specific material treatments or testing protocols are followed.
Risks of operating below the designated MDMT
Operating a pressurized system below its rated Minimum Design Metal Temperature is extremely hazardous. At these temperatures, the energy required to propagate a crack is significantly lower. A small surface flaw that would be stable at ambient temperature can instantly grow into a full-length fracture if the metal has reached its brittle state. This is why 2026 compliance audits prioritize MDMT verification for all cryogenic and low-temperature process units.

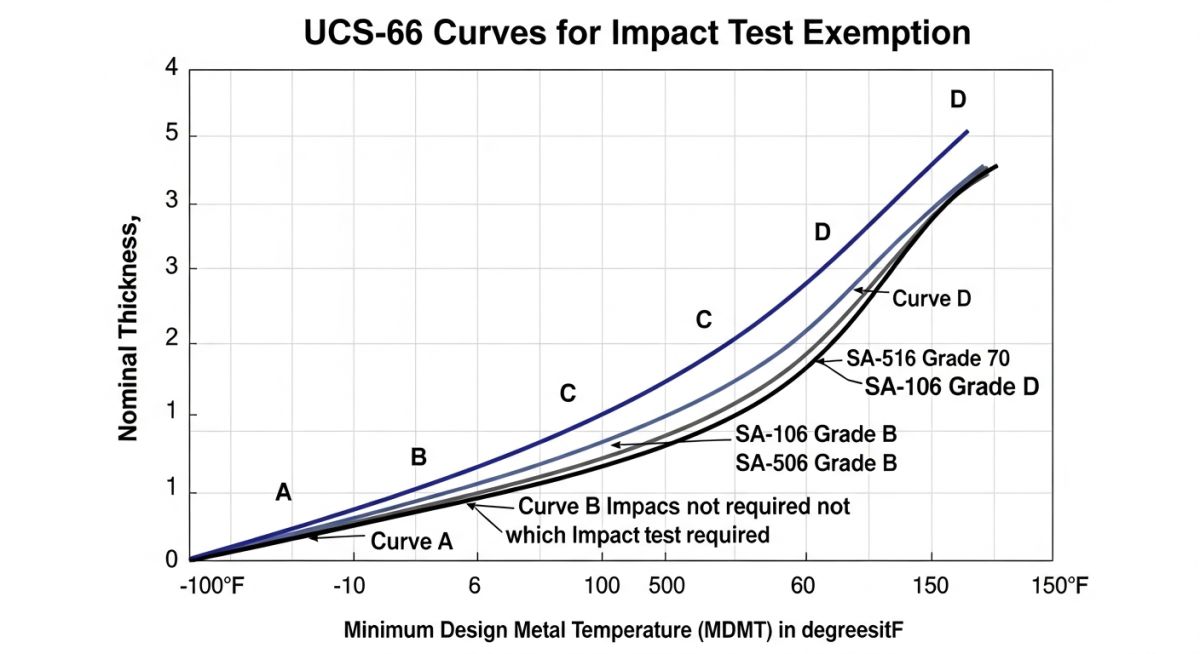
Figure 1: Illustration of ASME Section VIII exemption curves used to define safe MDMT zones.
Rules for Minimum Design Metal Temperature Without Impact Testing
Not every low-temperature application requires a Charpy V-Notch test. The ASME Section VIII Division 1 code provides specific "Exemption Curves" that allow engineers to determine if the Minimum Design Metal Temperature can be safely lowered without additional material testing.
ASME Section VIII Div 1 exemption curves (UCS-66)
The code utilizes Figure UCS-66, which consists of four curves (A, B, C, and D). Each material grade is assigned to one of these curves based on its manufacturing process and chemical composition. For instance, Curve D represents fully killed, fine-grained steels which offer the best low-temperature performance, while Curve A represents less ductile, non-killed steels. By identifying the material curve and the governing thickness, engineers can find the lowest allowable Minimum Design Metal Temperature without impact testing.
Material thickness vs. temperature thresholds
Thickness is a major factor in brittle fracture risk. As the wall thickness of a pipe or vessel increases, the state of stress becomes more triaxial, which inhibits plastic deformation. Consequently, thicker components have warmer (higher) MDMT requirements compared to thinner components of the same material. For example, a 1-inch thick plate might be exempt down to -20 degrees Celsius, whereas a 3-inch thick plate of the same grade would require impact testing at that same temperature.
Calculating Stress Ratio for Minimum Design Metal Temperature Reduction
One of the most powerful tools in 2026 engineering design is the ability to "earn" a lower Minimum Design Metal Temperature by reducing the operating stress of the component.
Defining the Stress Ratio, r
The Stress Ratio (r) is defined as the ratio of the actual calculated stress in the component to the allowable design stress. Mathematically, it is expressed as the stress at the coincident pressure and temperature divided by the maximum allowable stress at the design temperature. A stress ratio of 1.0 means the material is fully utilized. However, if the ratio is 0.4, it indicates the material is significantly over-designed for the current pressure.
How coincident pressure/temperature impacts the MDMT
Per ASME Figure UCS-66.1, if the stress ratio is less than 1.0, the code allows for a temperature reduction (TR) below the MDMT curve. If the ratio is very low (e.g., 0.35 or less), the component may be exempt from impact testing down to temperatures as low as -104 degrees Celsius, regardless of its original curve assignment. This allows engineers to avoid expensive testing by simply choosing a slightly thicker wall or reducing the operating pressure during cold-start conditions.
Mandatory Impact Testing Requirements for Low-Temperature Service
When a material cannot meet the exemption criteria of UCS-66, or when the Minimum Design Metal Temperature falls below -48 degrees Celsius for most carbon steels, mandatory impact testing is required. This ensures the material possesses the necessary toughness to resist crack initiation in 2026 high-integrity systems.
Charpy V-Notch test procedures
The Charpy V-Notch (CVN) test is the industry standard for measuring notch toughness. A standardized 10mm x 10mm specimen is notched and struck by a swinging pendulum. The energy absorbed during the fracture, measured in Joules or Foot-Pounds, indicates the material's ability to resist brittle failure at the Minimum Design Metal Temperature. In 2026, automated digital impact testers are used to ensure precise temperature control of the specimen within 1 degree Celsius of the test target.
| Material Specification | MDMT Curve (UCS-66) | Impact Test Requirement |
|---|---|---|
| SA-106 Grade B | Curve B | Required if T < -29 degrees C (at 1 inch thickness) |
| SA-516 Grade 70 (Normalized) | Curve D | Required if T < -48 degrees C (at 1 inch thickness) |
| SA-333 Grade 6 | N/A (Low Temp Steel) | Standardized Impact Testing at -45 degrees C |
How Start-Prof Software Manages Minimum Design Metal Temperature
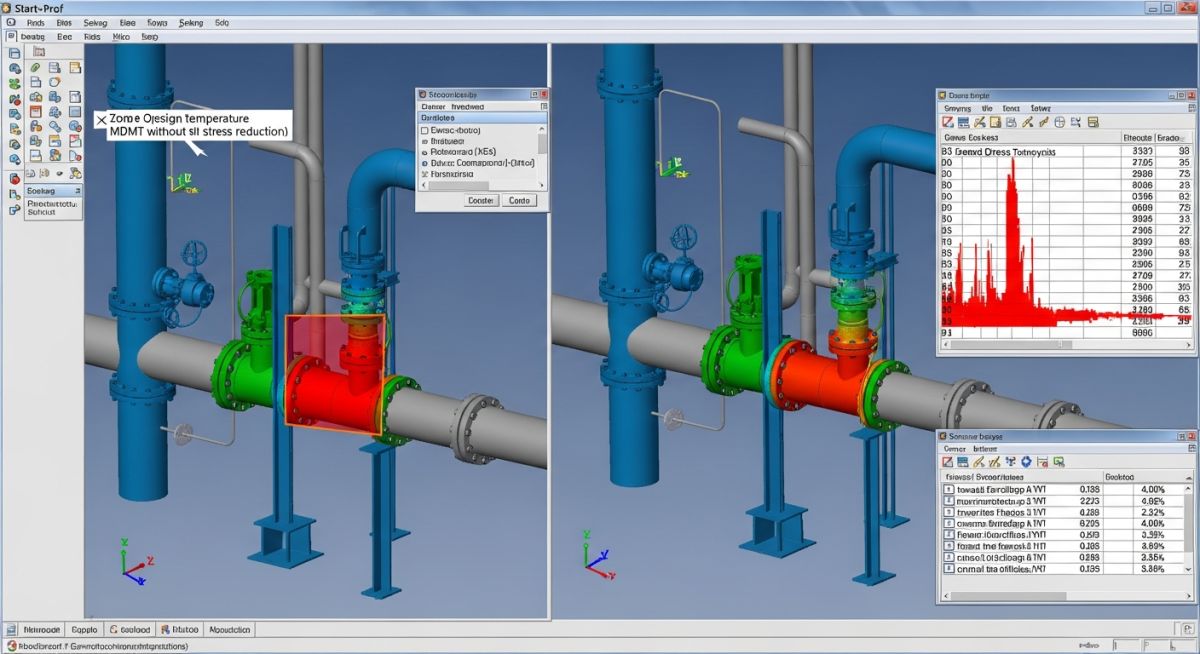
Modern piping stress analysis in 2026 relies on software like Start-Prof to automate the complex calculations involved in Minimum Design Metal Temperature verification. This reduces human error and optimizes material selection.
Automated material database checks
Start-Prof maintains an extensive database of material properties synchronized with ASME and ISO standards. When a user defines a design temperature, the software cross-references the material's curve assignment and wall thickness against the UCS-66 curves. It automatically flags any component where the operating temperature is lower than the calculated Minimum Design Metal Temperature.
Stress-based MDMT optimization in piping analysis
The software calculates the Stress Ratio (r) based on the actual longitudinal stress in the pipe. By applying the TR (Temperature Reduction) logic from UCS-66.1, Start-Prof can often prove that a material is exempt from impact testing even if the ambient temperature is colder than -29 degrees Celsius. This optimization can save projects thousands of USD in material costs and testing delays.
Practical Engineering Considerations for Minimum Design Metal Temperature
Post-Weld Heat Treatment (PWHT) and MDMT shifts
A critical factor often overlooked is the benefit of Post-Weld Heat Treatment (PWHT). For materials not otherwise required to be impact tested, ASME provides a bonus reduction of 17 degrees Celsius (30 degrees Fahrenheit) in the Minimum Design Metal Temperature if PWHT is performed voluntarily. This is because PWHT reduces residual stresses from welding, thereby lowering the risk of crack propagation.
Engineering Calculation: MDMT Reduction
The final allowable MDMT is calculated as: MDMTfinal = MDMTcurve - TRstress - TRpwht.
Where:
MDMTcurve = Temperature from UCS-66 chart.
TRstress = Temperature reduction due to Stress Ratio (r).
TRpwht = 17 degrees C (if applicable).
Field welding effects on material toughness
In 2026, field quality control is paramount. While a base metal may have a safe Minimum Design Metal Temperature, improper heat input during field welding can create a brittle Heat Affected Zone (HAZ). If the system operates at its MDMT limit, the HAZ becomes the most likely point of failure. Proper Weld Procedure Specifications (WPS) must include impact test qualification of the weld metal and HAZ for low-temperature service.
ASME B31.3 vs. Section VIII Minimum Design Metal Temperature Logic
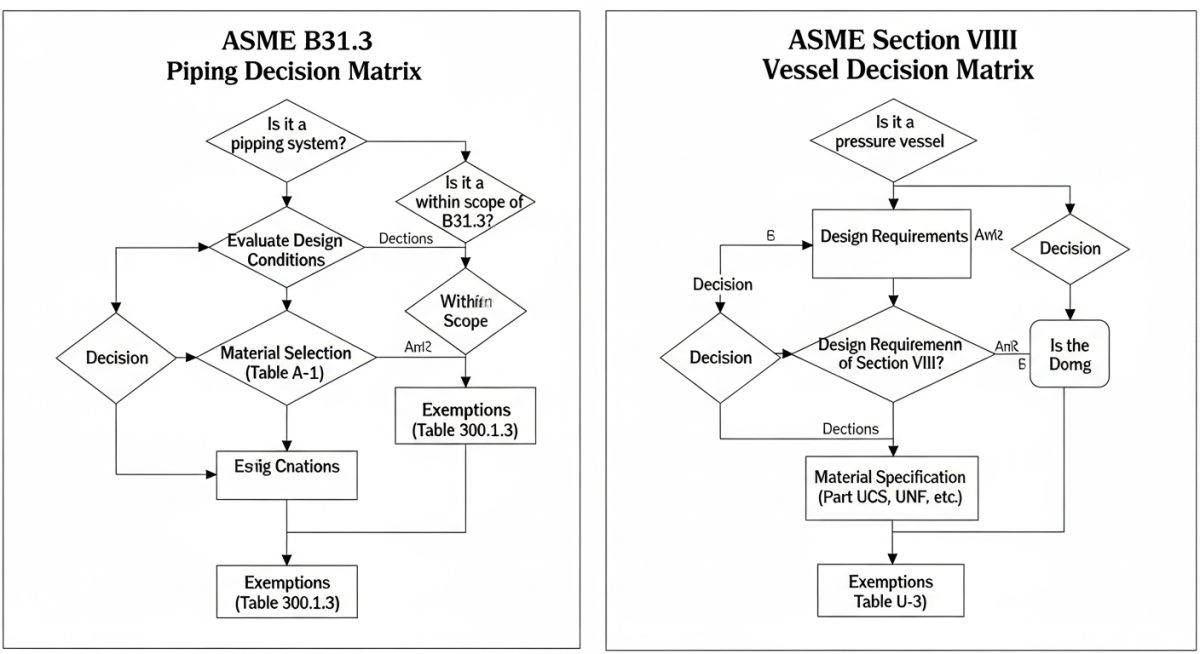
Engineers in 2026 often navigate between different codes depending on whether they are designing a process plant's piping or its primary storage vessels. While both codes aim to prevent brittle fracture, the application of Minimum Design Metal Temperature rules varies significantly between ASME B31.3 (Process Piping) and ASME Section VIII Division 1 (Pressure Vessels).

Figure 2: Divergent logic paths for MDMT compliance in 2026 piping and vessel standards.
Key differences in exemption curves
In ASME Section VIII, the Minimum Design Metal Temperature is governed by Figure UCS-66, which uses thickness and material curves. ASME B31.3, however, utilizes Table 323.2.2. While the underlying physics of material toughness are the same, B31.3 often provides more streamlined exemptions for standard piping components. For example, B31.3 allows certain carbon steel materials to be used down to -29 degrees Celsius without impact testing regardless of thickness, provided the design stress is sufficiently low, whereas Section VIII is more restrictive on thickness limits.
| Feature | ASME Section VIII Div 1 | ASME B31.3 (Piping) |
|---|---|---|
| Primary Reference | Figure UCS-66 / UCS-66.1 | Table 323.2.2 / Figure 323.2.2B |
| Stress Ratio Symbol | r | Stress Ratio |
| Default Carbon Steel Limit | -29 degrees C (subject to curve/thickness) | -29 degrees C (standard exemptions apply) |
| PWHT Credit | 17 degrees C Reduction (Voluntary) | Reduction allowed based on Stress Ratio |
Stress reduction factors in piping vs. vessels
The way Minimum Design Metal Temperature reductions are "earned" differs between the two codes. In Section VIII, the ratio r is strictly the coincident stress to allowable stress. In ASME B31.3, the calculation is slightly more nuanced, often involving a comparison of the design temperature against the "Minimum Temperature Without Impact Testing."
Furthermore, B31.3 allows for a specific impact testing exemption if the operating stress is less than 0.3 times the allowable stress, permitting operation down to -104 degrees Celsius without further analysis. Section VIII requires a more rigorous calculation of the ratio r to reach that same -104 degrees Celsius threshold. For engineers in 2026, understanding these subtle shifts in Minimum Design Metal Temperature logic prevents over-specifying expensive materials in piping systems where standard carbon steel is perfectly adequate.
Minimum Design Metal Temperature Calculator
Estimate the impact of stress reduction on your material limits based on 2026 ASME Section VIII Division 1 guidelines.
Example: -29 for Curve B at 1 inch thickness.
Note: This calculator uses the simplified temperature reduction logic where Reduction (TR) = (1 - Stress Ratio) multiplied by 55.5 degrees C for ratios between 0.35 and 1.0. For ratios below 0.35, the exemption limit of -104 degrees Celsius is applied. Always verify against 2026 ASME Figure UCS-66.1 for official compliance.
Don't miss this video related to Minimum Design Metal Temperature

Summary: Welcome to Day 6 of our 40-day ASME B31.12 Hydrogen Piping Code series. In this lecture, we continue our discussion on ......
Case Study: Optimizing Minimum Design Metal Temperature for Arctic Processing

Project Data (2026)
- Facility: North Slope Natural Gas Expansion
- Component: HP Separator Vessel (SA-516 Gr. 70)
- Design Pressure: 8.5 MPa
- Operating Temp: -45 degrees Celsius
- Governing Thickness: 38 mm (1.5 inches)
Technical Challenge
The material was assigned to Curve D under ASME Section VIII Division 1. At a thickness of 38 mm, the default Minimum Design Metal Temperature from Figure UCS-66 was -32 degrees Celsius. The client required operation at -45 degrees Celsius without performing a new Charpy V-Notch Test on existing stock.
Carbon Steel Brittle Fracture Analysis
The engineering team identified a significant risk of Carbon Steel Brittle Fracture if the vessel were pressurized to 8.5 MPa at the ambient winter temperature of -45 degrees Celsius. Initial analysis showed the vessel was 13 degrees Celsius "too cold" for its thickness according to the standard curves.
Engineering Fix: Stress Ratio Calculation
By utilizing 2026 computational stress analysis, the team performed a detailed Stress Ratio Calculation. They discovered that while the design pressure was high, the actual circumferential stress at the minimum temperature was only 65 percent of the allowable stress (r = 0.65).
Using Figure UCS-66.1, a Stress Ratio of 0.65 allows for a temperature reduction (TR) of 20 degrees Celsius.
Adjusted MDMT calculation: -32 degrees C (Base) - 20 degrees C (TR) = -52 degrees Celsius.
Lessons Learned and Material Toughness Standards
The project successfully avoided costly Impact Testing Requirements by demonstrating that the lower operating stress provided a sufficient safety margin against fracture. This case highlights that Minimum Design Metal Temperature is not a static material property but a function of both temperature and coincident stress levels. In 2026, leveraging the stress ratio reduction remains the most cost-effective method for qualifying carbon steel for sub-zero service.
Frequently Asked Questions: Minimum Design Metal Temperature
Is impact testing required for carbon steel below -29 degrees Celsius?
How do ASME Section VIII Div 1 exemption curves affect MDMT?
Can the stress ratio calculation reduce the impact testing requirements?
What are the acceptance criteria for Charpy V-Notch test toughness?
Conclusion
Designing for low-temperature service requires a meticulous understanding of Minimum Design Metal Temperature. Whether you are performing manual calculations using ASME UCS-66 curves or utilizing 2026 software tools like Start-Prof, the goal remains the same: ensuring the structural integrity of carbon steel systems against brittle fracture.
By optimizing material selection, utilizing stress ratio reductions, and understanding the nuances of impact testing, engineers can deliver safe and cost-effective solutions for the most demanding thermal environments. Always ensure that your Minimum Design Metal Temperature is verified against the latest 2026 project specifications and international codes.
📚 Recommended Resources: Minimum Design Metal Temperature
Read these Guides
🎓 Advanced Training


